Hi
I was thinking perhaps, 2 separate chambers 1) hot, and 1) cold and only connected perhaps with a pipe,
So the hot are should still expand, and the cold should still contract, and the pipe which connects the 2 separate displacement containers would have a heat/exchanger neutralizer which would I guess be more cold, so that any heat coming from the hot side into the cold side would be either neutral or perhaps cooled but the long pipe which could be either air cooled or perhaps water cooled.
On the power piston side, that could be just be a 3) way valve which could expose the piston at the proper time, to either cold or hot depending on the direction of the valve.
On valve turned toward the cold side, the piston would contract, and the valve then turned to hot side the piston should expand
I wonder if this could be done with no real air displacer at all and only 2) separate air containers, which would simply have a valve operate the hot/cold air into the piston.
And the containers would only be connected by a neutralizing air pipe.
I don't know if that would work,however it would solve the problems of air leakeage and sleeve bearing problems since there would be no up and down movement of any displacement, the displacement would be caused only by a 3)way valve.
I might build something to test out this theory a bit.
Anyhow thanks for the reply.
I've started building my walking beam 55 gallon drum
-
daniel_bingamon
- Posts: 3
- Joined: Wed Oct 01, 2008 5:14 pm
- Location: Kings Mills, OH
- Contact:
I recently put the little Walking Beam Stirling Engine data into Autocad and I saw your post on making a 55 gallon drum walking beam Stirling Engine. So, I scaled the drawing up to the diameter of a 55 gallon drum and it appears that 2.5 drums in height will make a direct scaled up version.
Here the drawing:
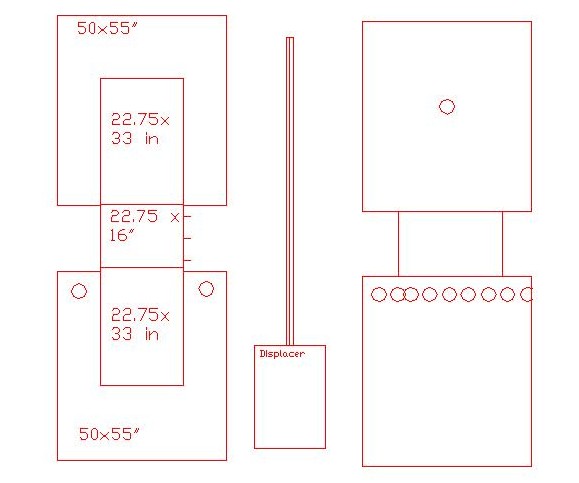
Here the drawing:
-
supertankerm60a3
- Posts: 3
- Joined: Sun Oct 26, 2008 9:57 pm
- Location: california
OK, I am new here but have been around a while. I think there may be a few issues with the use of 55 gal drums or any other drum for that matter, and a altermative.
The problem is the drums are comparativley very thin and to get any real work out of the engine you need to apply significant pressure to the working piston. This is not a problem with toy engines that can barely overcome their own friction. They no not operate at pressures even approching 1 PSI.
The drums will deform with pressure as low as 5 PSI. this will only get worse as the engine ages and rust and corrosion have their way with the steel. With a radius of 18 inches (a guess) and a aressure of only 10 PSI the total amount of force applied to the end of the drum of 1017 pounds. This will cause a significant amount of deformation. The ends will be REALLY bulging!! If it works the noise of the "oilcanning" (The popping sound of the sheet metal) will drive anyone around it nuts after a short time. You also need to think about the issue of metal fatigue. the constant popping back and forth of the metal will cause it to get weak very fast.
There is also the "vacuum" side of the stress to consider. This may or may not be enough to crush the cylinder during the parts of the working cycle that are under vacuum. I need to re-read your post to see what you were planning to use as the working cylinder set up.
Please allow me to make a simple change suggestion. Use a pressure vessel instead. this could be found from several things.
1. Air compressor tank
2. Water heater tank
3. Propane tank (be EXTREAMLEY carefull when cutting this one open)
There are significant advanteges here.
1. These all are much thicker that the drums.
2. They can be found in lots of sizes, up to and including really big.
3. They are ALL have been engineered to contain pressure.
Granted there will be significant weaknesses inrtoduced with the seam made to install the displacer piston (which also has to resist the working pressures) and opening(s)for the connecting rod. another advantage is they 'almost' all have rounded ends that increase the surface area needed to collect and transfer your heat.
OOPS! is a bad word to hear in a nuclear weapons warehouse.
On the subject of regenerators, some builders have used a 'stack' of thin plates with holes in them. Make x number of discs and drill them all at one setting with y number of holes and a central/axial hole. Mount them on a shaft with a washer between each, turning each disc by some random amount so that holes don't line up.
Home Brew 55 gal drum Regenerator
Most of the designs I've seen show a "stationary" regenerator usually in the middle 'annular' section of the displacer cylinder wall area. That would be hard to do with a big drum though.
So with your 55 gallon drum cylinders you could add some 1" or larger pipe flanges (top and bottom of drum sides) with a mesh screen in the flanges. Swedge up to a larger diameter pipe between the two ports. Install a nipple Tee and union at the top end. Fill/pack the inside of the pipe (via the Tee) with something like steel wool or coarse gravel, or?? The filler material will keep the volume increase minimized. The screens will keep crap from moving into the cylinder?
Another ready made regenerator might be an old discarded catalytic converter? You know they breathe well and have a ready made honeycomb structure inside.
The air should swish back and forth through the regenerator as the displacer moves up/down. You'd need a closer fitting piston or disc though.
Does any of that make sense?
Rich DeMartile
Re: I've started building my walking beam 55 gallon drum
I've not posted in a long time, but the project is still on.
I'm finally getting to work on this project.
I'll post back the vid once it's finished and I plan to use frensel lenses to try and power it during the day time if I can
Anyhow FYI
I'm finally getting to work on this project.
I'll post back the vid once it's finished and I plan to use frensel lenses to try and power it during the day time if I can
Anyhow FYI
Re:
supertankerm60a3 wrote:The problem is the drums are comparativley very thin and to get any real work out of the engine you need to apply significant pressure to the working piston. This is not a problem with toy engines that can barely overcome their own friction. They no not operate at pressures even approching 1 PSI.
The drums will deform with pressure as low as 5 PSI. this will only get worse as the engine ages and rust and corrosion have their way with the steel. With a radius of 18 inches (a guess) and a aressure of only 10 PSI the total amount of force applied to the end of the drum of 1017 pounds. This will cause a significant amount of deformation. The ends will be REALLY bulging!! If it works the noise of the "oilcanning" (The popping sound of the sheet metal) will drive anyone around it nuts after a short time. You also need to think about the issue of metal fatigue. the constant popping back and forth of the metal will cause it to get weak very fast.
This is a very good point, I made a small vacuum chamber so I could repair a vacuun tube many years ago and the external pressures applied by the atmosphere are considerable! This chamber was only eight inches around with plexiglas ends. I hope the drums work out and that the operating pressure turns out to be much lower than 5 psi.
-
daniel_bingamon
- Posts: 3
- Joined: Wed Oct 01, 2008 5:14 pm
- Location: Kings Mills, OH
- Contact:
Re: I've started building my walking beam 55 gallon drum
I don't think it will be a problem if the engine is operating quickly, the displacement will relieve the pressure.
Something, I've thought about these walking beam engines. Because it is a beam with items on both sides, the idea is to counter the weight by the position of the flywheel on the other end of the fullcrum. I suppose additional weights can be placed on the opposite side of the displacer to cancel out it's weight. That reminds me of the story about the doors at NORAD - they're huge but with the ball bearing and the precision of their installation, they move with ease.
Something, I've thought about these walking beam engines. Because it is a beam with items on both sides, the idea is to counter the weight by the position of the flywheel on the other end of the fullcrum. I suppose additional weights can be placed on the opposite side of the displacer to cancel out it's weight. That reminds me of the story about the doors at NORAD - they're huge but with the ball bearing and the precision of their installation, they move with ease.
-
stanhbaker
- Posts: 30
- Joined: Wed May 31, 2006 5:14 pm
- Location: KnoxTn
Re: I've started building my walking beam 55 gallon drum
Building a working Stirling engine from a 55 gal. drum is a very difficult proposition as you run into the problems of scale.
A simple tin can (food container) is easy and almost anything within reason will work.
When scaling up liner dimensions increase linearly, areas increase by the square of the linear dimensions, and volumes increase by the cube of the linear dimensions.
The quantity of air is vastly increased (cubed) while the area for heat transfer is (squared) reducing the effectiveness of heat the air and thus the expansion or contraction on cooling.
I suspect that rpm will be inversely proportional to the cube of the linear dimension.
"Do nothing simply if a way can be found to make it complex and wonderful"
Why be difficult?.. When with just a little application you can be absolutely difficult!
-
stanhbaker
- Posts: 30
- Joined: Wed May 31, 2006 5:14 pm
- Location: KnoxTn
Re: I've started building my walking beam 55 gallon drum
Start a new Walking Beam engine using two #10 cans that are used by restaurants and food services. Cut the bottom out of one can and solder it to the top of the second can to make a large displacer cylinder. Either a water jacket will have to be made or copper tubing soldered to the upper can to provide for cooling water. The displacer itself will have to be made of heat resistant material such a mineral foam or similar from your big box hardware store. The rest of your walking beam engine should be straightforward.
Have fun and post it on YouTube for all to see.
stanhbaker
Have fun and post it on YouTube for all to see.
stanhbaker