LTD to HTD Stirling engine converstion

Discussion on Stirling or "hot air" engines (all types)
Tom Booth
Posts: 3319
Joined: Tue Nov 07, 2006 2:03 am
Location: Fort Plain New York USA
Contact:

LTD to HTD Stirling engine converstion

Post by Tom Booth »

Where there's a will there's a way.

Resize_20230512_202435_5894.jpg
Resize_20230512_202435_5894.jpg (280.67 KiB) Viewed 9249 times

Cut from a pickle jar, similar to the one in the background.

A few small chips on the edge, but useable at least. I need to get a proper glass cutting blade.

I gave up on the little bottle cutting tools and got out the heavy machinery. My tile cutter with the diamond saw blade.


https://youtu.be/7rXOaW1anVc
Tom Booth
Posts: 3319
Joined: Tue Nov 07, 2006 2:03 am
Location: Fort Plain New York USA
Contact:

Re: LTD to HTD Stirling engine converstion

Post by Tom Booth »

High temperature gaskets from a silicon rubber oven mat.


https://youtu.be/Wn2PBRdeNXA
Tom Booth
Posts: 3319
Joined: Tue Nov 07, 2006 2:03 am
Location: Fort Plain New York USA
Contact:

Re: LTD to HTD Stirling engine converstion

Post by Tom Booth »

What prompted me to go back to bottle cutting was I had a mishap with my fiber clay engine body:

Resize_20230512_213930_0089.jpg
Resize_20230512_213930_0089.jpg (304.28 KiB) Viewed 9242 times

I had been waiting some days for the clay to dry and was getting ready to fire it in the kiln, but checking the size, I found it had shrunk.

To try to remedy that, I tried sanding down the inside enough that it could still work. It wouldn't have taken much sanding, but I broke it in the process.

Probably just as well at this point as I really did want to have the view inside the engine through the glass

It got me re-thinking about how to cut the bottles and I thought maybe the tile saw would work.

Checking on the web, there were numerous references and videos on cutting glass bottles with a tile saw, so I gave it a try.

Next time I try ceramics I have to allow for shrinkage, but the waiting for clay to dry, the energy intensive firing in the kiln, and other issues, like shrinkage make cutting an old glass jar imuch quicker, simpler, easier and cheaper.


Probably the tile saw could be used to cut a ring out of a dollar store coffee mug or something, if I could find one the right size:

Resize_20230512_215910_0084.jpg
Resize_20230512_215910_0084.jpg (302.87 KiB) Viewed 9239 times
VincentG
Posts: 630
Joined: Tue Feb 21, 2023 3:05 pm

Re: LTD to HTD Stirling engine converstion

Post by VincentG »

Looking forward to the results of this.
Tom Booth
Posts: 3319
Joined: Tue Nov 07, 2006 2:03 am
Location: Fort Plain New York USA
Contact:

Re: LTD to HTD Stirling engine converstion

Post by Tom Booth »

VincentG wrote: Sat May 13, 2023 5:19 am Looking forward to the results of this.
Here we go.

Apparently steam transfers heat more readily than the hot air above the alcohol burner. I was confused when the engine kept slowing down when put on the "high heat". I thought maybe it was overheating.

Actually, putting my hand over the can with the alcohol burner demonstrated to me that the near direct contact with scalding hot water is initially hotter than the warm air rising from the flame.

However the heat did build up eventually once the top of the can was covered by the engine.


https://youtu.be/fockxmOGTBs


To remove ambiguity, and just to see what would happen, next I used the electric stove as the heat source.

Eventually something around the displacer sleeve started to bubble and smoke. Not sure what that was.

It seemed to smoke inside the engine as well and the fumes and smoke gummed up the power piston and cylinder, so the engine was not running as well by the end, and would no longer run just on hot water.

After taking out the piston it was clearly covered with some gummy residue from whatever was burning. After removing the piston and giving it and the cylinder a good cleaning it ran well on just tepid water.

It stopped running when the water cooled down to 120°F with a ∆T of about 50° which is not great, but I think, more or less typical for this type model.


https://youtu.be/eGiJZzIkquA
Tom Booth
Posts: 3319
Joined: Tue Nov 07, 2006 2:03 am
Location: Fort Plain New York USA
Contact:

Re: LTD to HTD Stirling engine converstion

Post by Tom Booth »

Handles a propane torch.


https://youtu.be/zD5vCIBQz8Q


Seems to be successful, though I think I see a lot of room for improvement. The bolts for example are not even stainless steel but have rusted quite a bit over the years, so heat conduction through them is pretty much unrestricted.

The foam glass displacer is probably a fairly good insulator, but would probably benefit from some kind of heat reflective coating.

The model has various issues. The piston is held to the connecting rod by this weird claw-like press-on springy thing that slips at high RPM. Eventually the piston starts colliding with the displacer.

I think my silicone oven mat gaskets have been gradually degrading.

I think the throw of the piston (compression ratio) is much shorter than it could be.

All in all though, this has mostly been just a proof of concept, but it might be interesting to see what this little model could do as far as turning a generator.

I'm also anxious to put together a small hydrogen generator and see if the little engine can take the heat of a hydrogen gas flame. I haven't been able to kill it so far.
Tom Booth
Posts: 3319
Joined: Tue Nov 07, 2006 2:03 am
Location: Fort Plain New York USA
Contact:

Re: LTD to HTD Stirling engine converstion

Post by Tom Booth »

BTW, the reason for transferring the engine from running on hot water (LTD) over to high temperature flame or burner is;

First of all, I want to make sure the engine can run in the ordinary way; that it is actually a functioning engine with good seals, no leaks, that it hasn't been damaged by all the modifications.

Secondly, I don't want to sacrifice the advantages of an LTD design. The ability to run at a high temperature should not be at the expense of being able to still run at low temperature, which might be the case, if, for example, the displacer were much heavier than usual.

As it is, the foamed glass grill brick material is somewhat heavier than the foam rubber, but still functional.

Third, I wanted to know that the LTD engine had not been damaged as a result of its excursion into the realm of high temperature operation due to warping, blown seals, melted components, excess wear or whatever, so back onto the hot water.

In the video, though, the residual heat in the engine, even on the "cold" side, after being over the flame was much hotter than any heat left in that cup of water that was sitting there.

After the engine cooled down, however, I was able to verify that it could still run on a low temperature heat source.

I think the smoke around the displacer shaft may have just been some lubricant (superzilla) burning off.
Tom Booth
Posts: 3319
Joined: Tue Nov 07, 2006 2:03 am
Location: Fort Plain New York USA
Contact:

Re: LTD to HTD Stirling engine converstion

Post by Tom Booth »

Though generally successful, I've been noticing that the cold side of the engine is heating up pretty rapidly. I would say much more rapidly than your typical LTD engine, which is very little or not at all.

I suspected the steel bolts as the main culprit, but in an effort to verify this with the infrared camera, the glass cylinder itself appears as hot or almost as hot as the bolts.

Checking the engineering toolbox website, glass, while generally a poor conductor of heat is 5 times more conductive than Acrylic. Given that it comprises the entire engine body, I would say that is significant.

Foamed glass, though, is 5 times LESS heat conducting than acrylic, so the foam glass displacer is pretty much eliminated as a culprit.

The steel bolts are of course many times more heat conducting than glass, but the bolts are very long and thin and few in number compared with the solid rung of glass.

In the thermal image, the bolts do not stand out as significantly hotter than the glass
Resize_20230514_135747_7062.jpg
Resize_20230514_135747_7062.jpg (159.05 KiB) Viewed 9201 times
VincentG
Posts: 630
Joined: Tue Feb 21, 2023 3:05 pm

Re: LTD to HTD Stirling engine converstion

Post by VincentG »

Nice work Tom, do you have any pictures of the current displacer? Have you estimated its porosity yet?
Tom Booth
Posts: 3319
Joined: Tue Nov 07, 2006 2:03 am
Location: Fort Plain New York USA
Contact:

Re: LTD to HTD Stirling engine converstion

Post by Tom Booth »

VincentG wrote: Sun May 14, 2023 12:07 pm Nice work Tom, do you have any pictures of the current displacer? Have you estimated its porosity yet?
Well, the displacer is in the engine, if that's what you mean by "current displacer".

I didn't take pictures, but can upload a video. It is made from a "grill stone".


https://youtu.be/h9VwAWkpyro


These grill stones were recommended in the printed instructions that came with the Myers Stove Fan castings.

Such a grill stone, or other pumice type stones available are OK for small model engines. I'm researching how to make the stuff with larger power producing engines in mind.

My DIY foamed glass was about three times heavier than these commercial grill blocks, and I wasn't having much luck producing anything better.

The lightest thing I've made so far was foamed paper clay using Drexel. It weighed in at just 1 gram, which is 1/3 the weight of the original foam rubber displacer, but that was much too fragile. The foamed concrete is not much lighter than the DIY foamed glass and I still don't know if it will hold up.

The grill blocks are not able to stand up to direct flame but it is holding up so far as a displacer, only getting indirect heat.

These grill blocks are apparently manufactured using sulfur because they stink like rotten eggs when cut open.

It seems larger foamed glass panels might be starting to become more readily available, maybe.
Tom Booth
Posts: 3319
Joined: Tue Nov 07, 2006 2:03 am
Location: Fort Plain New York USA
Contact:

Re: LTD to HTD Stirling engine converstion

Post by Tom Booth »

A YouTube viewer of this engine suggested adding a generator (magnets on the flywheel type), however, there is not really room on this engine between the flywheel, piston and connecting rod for magnets to be attached without them tugging on the metal connecting rod.

I got looking over my parts inventory and I have a couple old broken thermoacoustic type engines (the glass parts are what generally break) with good pulleys, generators, LED's and bearings, so I'm thinking about how to utilize them.

Resize_20230515_031458_8569.jpg
Resize_20230515_031458_8569.jpg (176.59 KiB) Viewed 9182 times

Surprisingly the pulley from the thermoacoustic engine fit snugly on the LTD crank without modification.

So far so good.

Resize_20230515_031459_9536.jpg
Resize_20230515_031459_9536.jpg (179 KiB) Viewed 9182 times
Tom Booth
Posts: 3319
Joined: Tue Nov 07, 2006 2:03 am
Location: Fort Plain New York USA
Contact:

Re: LTD to HTD Stirling engine converstion

Post by Tom Booth »

This turned out to be comparatively easy.


https://youtu.be/nKCOQf5nk5c


The main alteration required was to change the gear ratio. I used a plastic milk jug lid as a large pulley, and using the little pulley to hold it in place on the shaft, with a bit of hot glue.

I've always been puzzled by the design of these engines with gears at a 1:1 ratio.

I could light the Supplied LED brightly and effortlessly, by just giving the shaft of the generator a quick twist with my finger tips, no resistance could be felt at all, but a thermoacoustic engine driven by a propane torch running at (relatively) very high RPM and obviously having plenty of power could barely do the job, and that, after a long run with a gradual increase in speed.

It is just very high RPM motor/generators coupled with relatively low RPM engines in 1 to 1 gear ratio.

Change the gear ratio and it can light multiple LED's


https://youtu.be/-e-N-Hin5hg


And this engine, with a string of 20 LED's is still not struggling, I'm pretty certain with a slightly larger pulley on the flywheel, or smaller pulley on the generator, any of these little high temperature model engines could light all those LED's to full brightness.
Tom Booth
Posts: 3319
Joined: Tue Nov 07, 2006 2:03 am
Location: Fort Plain New York USA
Contact:

Re: LTD to HTD Stirling engine converstion

Post by Tom Booth »

From VincentG:

Resize_20230515_134607_7151.jpg
Resize_20230515_134607_7151.jpg (306.33 KiB) Viewed 9160 times

Now that's what I call a gaar ratio!!

Needless to say, my little LTD to high temp conversion engine, so far, is not taking any advantage of the kind of numerous improvements possible, such as those being addressed by VincentG, like Dwell/timing.

The glass housing and steel bolts are still transmitting a LOT of heat across to the cold side. I haven't yet attempted to install bearings.

There is still some distance to go before this type engine reaches it's full potential for power output.
VincentG
Posts: 630
Joined: Tue Feb 21, 2023 3:05 pm

Re: LTD to HTD Stirling engine converstion

Post by VincentG »

Very impressive Tom. I think with right gearing and generator to keep your engine in its powerband (I think around 60-100rpm) you'll really see some good output. I'd be more than happy to send you some 3d printed flexures and gears to experiment with.
Tom Booth
Posts: 3319
Joined: Tue Nov 07, 2006 2:03 am
Location: Fort Plain New York USA
Contact:

Re: LTD to HTD Stirling engine converstion

Post by Tom Booth »

Possibly the most annoying issue I have with these engines, though it is a kind of love-hate thing, is the design of the power piston connecting rod:

Resize_20230515_161120_0614.jpg
Resize_20230515_161120_0614.jpg (200.81 KiB) Viewed 9150 times
Resize_20230515_161121_1002.jpg
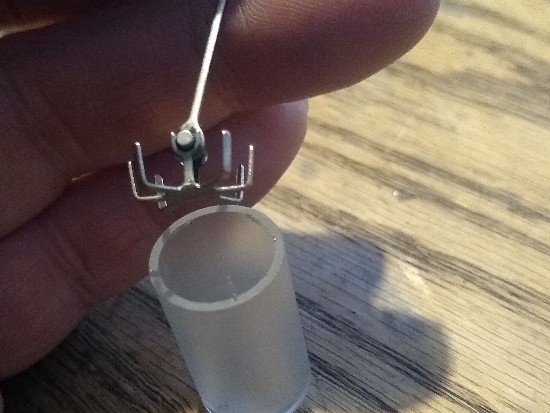
Resize_20230515_161121_1002.jpg (158.68 KiB) Viewed 9150 times

That funny claw or fishhook-like thing just slides down inside the piston and, I guess is supposed to remain in place by spring tension.

It makes slightly adjusting the compression ratio possible, which is interesting, but whenever the engine has mysteriously quit working, more often than not it is because this thing has slipped, allowing the piston to fall down too far into the displacer chamber. I believe this is due to a vacuum condition that results after the power stroke from expansive cooling of the working fluid.

The slippage incrementally robs power during "contraction", resulting in a gradual slow down and eventually the piston drops so low it interferes with the displacer and may jam up the engine altogether.

A little super glue or something could prevent movement, but, at times, being able to remove the connecting rod is a necessity.

This is incidental but I wanted to mention it as my videos are never pre-planned or edited/choreographed etc. Usually I habitually record a first trial of some new ideas or experiment, because often it could be the only opportunity, since many experiments end up damaging or completely destroying the engine, so it ends up in the spare parts bin.

The engine,I found, after making these last two videos, did have this connecting rod slippage problem again, probably resulting in less than optimal performance.
Post Reply